Wow, this is so nice and clean. Good job!!
Looks like you build version 3.0 of what i have (and what now feels like version 0.1 of your board

).
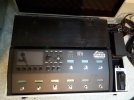
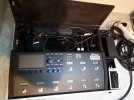
I had this "Rockcase by warwick" already for my Boss GT 1000 and reworked the inside of the case a lot to adapt to the FM9. I had plans to first build a concept case and then build it again but better, but this works and i prefer to play guitar
My case is less shockabsorbing than yours i guess, but i always make sure to transport my own gear so there not really any risk.
For anyone who is wondering, yes i have a polycarbonate piece a few millimeters above the big screen to protect it from fallings plugs etc, fitted with small velcro strips.