Show us your MFC setups! (post your pics)

Thanks, glad you like the set!

Bill


Sent from my iPhone

Since I really don't use phaser and flanger (they are just there to make the board look purdy), I'm thinking about ordering something like "Scene UP" & "Scene Down" to replace their positions on the board since I just got into using scenes and what not. Or maybe order something else... nothing wrong at all with the labels because they are top notch, but I'm deciding on what I would rather put there.. would rather have something I actually use on my board. Or I could just leave those there to make it pretty, and secretly use those positions as the scene up and down buttons :p
 
It is absolutely AMAZING what can be done with one single channel in the Axe-Fx II when you use expand the MFC-101 to its full potential!!!

Photo1_600.JPG

http://swww.srwspoon.com/image/Photo1.JPG

The complements are rolling in with my new rig; I'm well pleased! :)

P.S. iPhone photos can't do justice to the fabulous custom GIGWRX labels!
 
Just wanted to post mine after all the programming. Board is an Odyssey Board. Comes in a flight case with wheels, but i mainly use the pedalboard. I attached the cabinet handles from Home Depot and make the routings in the bottom. Labels are getto Homemade but they work. Switches TT from Mission as well as the SP1 and Sp2:

IMG_2656.jpg
 
Photo1_600.JPG

http://swww.srwspoon.com/image/Photo1.JPG

PedalBoardCase600.jpg

http://www.srwspoon.com/image/PedalBoardCase.jpg

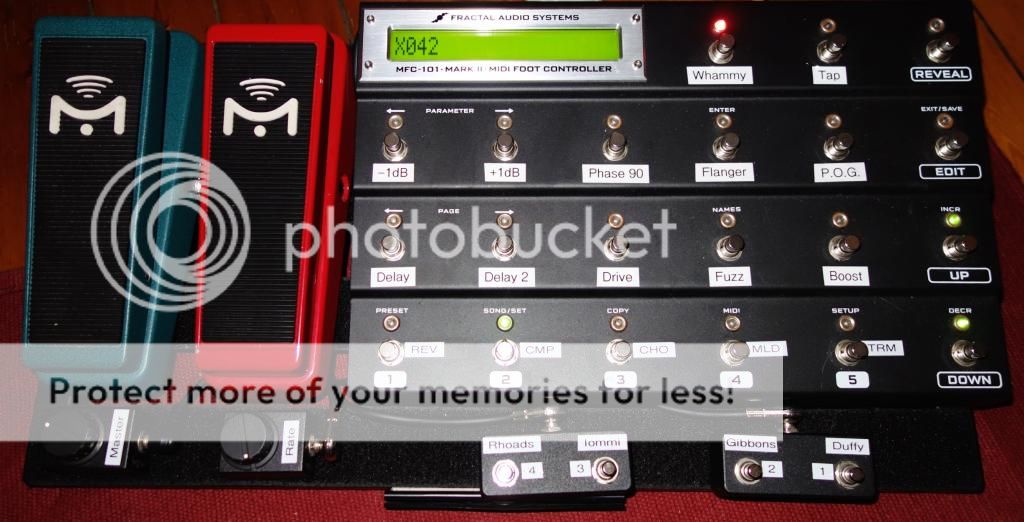
A few people have asked about the dimensions of this my pedal board setup so here you go.

Here is a link to a drawing of the pedal board.
http://www.srwspoon.com/files/PedalBoard.pdf

You should know a couple of things.

1. I use a marine-grade high-strength 9 ply 1/2" plywood for the base board for long-life moisture-resistance and strength; don't get that cheap crap at Menard's, Lowe's or Home Depot humidity will eat it up over time and it will start to delaminate, get the hard wood sanded 1/2" plywood or get the 3/4 " cheap crap.

2. The rear of the MFC-101 is elevated 1 1/2" right now and I might elevate it a little more so I don't inadvertently tap switches below the one I am trying to tap, that elevation will have to be adjusted to fit your personal taste.

3. The surface of the pedal board is COMPLETELY covered with a fabric Velcro loop type of upholstery that you can get at a fabric store and on the bottom of each pedal board component is a 3" wide strip of Velcro hook that has PSA (Pressure Sensitive Adhesive) that way components can be removed/moved.

4. The bottom of the board is completely covered with an anti-skid type of upholstery so when I set it on smooth stages and tap on the switches the board won't wander around at all, it stays put. The upholsteries are glued to the top and the bottom of the board with a spray permanent contact adhesive.

5. This pedal board is rather heavy and awkward to carry, that's why I got a rolling Gator case for it. It's a Gator Case GKPE-61-TSA 61-Key ATA Keyboard Case with TSA Latches. It's not cheap; but it is WELL built, has rollers like a suite case and everything fits perfectly!

Hope the layout works as well for you as it does for me.
Spoons
 
My latest version:

mfc101_zps46eda9f3.jpg


A couple of things to note:

  • This all sits on a Pedaltrain 2
  • The 4 buttons at the bottom selects Scene 1-4.
  • I pay homage to 4 great guitarists on the Scene selectors to get me inspired :)
  • I use scene 1 as the default sound for each preset.
  • Scene 2 is for a slightly boosted default preset, if I just want lead lines to stand out a little bit.
  • Scene 3 is a Lead tone and Scene 4 alternate Lead tone
  • If I hold down Scene button 1, it will set Scene 2 until I release the button (CC#34 on=001, off=000) - just figured that out today, I think it’ll be super useful.
  • I also have some specific song presets where Scene 1-4 is instead for intro, verse, chorus and lead and similar.
  • I have 4 expression pedals on the left:
  • I found that even though I'm right handed, I prefer to use my left foot to control my expression pedals so I moved them to the left hand side.
  • The green is my spring loaded wah
  • The red is mostly used to set delay level
  • The small dial to the left is my master volume (volume block after the cab block in all my presets)
  • the small dial to the right is used for rate control in the Phaser, I use this very sparingly.
 
Last edited:
Nice and smart setup.

Fuzz: is this a Drive2 block, or Drive in Y mode?
 
3 weeks since my last picture and things already have changed again. :)

15mfc.jpg


Bank Size = 5 (= 5 presets on bottom row). The numbered labels indicate the last digit of the preset number, for convenience.
And the text written on the tape at the top of the pedalboard indicate the contents of each bank.

The labels between parentheses indicate the bottom row functionality after pressing Reveal.
"Vibe" changes the Phaser block from X to Y. "Fuzz" changes the Drive block from X to Y.
I don't use Tap Tempo often so it's also on the Reveal row.

"Sat/B" is a general function switch assigned to CC 19 (= External Controller 4). I use this controller to engage/bypass the SAT switch (in my Friedman amp block) and the Boost switch (in my Morgan AC-20 amp block).

A single "Scene Up" switch suffices for my purposes.

IA 10 is not assigned to anything currently.

On a Pedaltrain 2.
 
Last edited:
Back
Top Bottom