P-Rails wiring help?

Marantz

Inspired
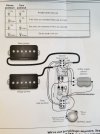
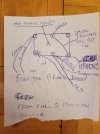
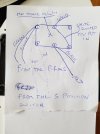
Sorry if this is too off topic, but I'm pulling my hair out over here and need help. I received the Seymour Duncan P rails, I tried installing it, I've got the wiring wrong somehow, the pickup only works in one position on the mini toggle, in the other two positions there is no sound. The other pickups on the guitar work fine. I've attached a highly technical and professional drawing I did myself off what wires I sent to the mini toggle. Here it is20220810_115300.jpg
 
Last edited:
The schematics on the Duncan site specify using a ON-OFF-ON DPDT 3 way switch. I’m away from the house today. Without being there with a meter I can’t offer much help. But you should start with the correct switch. Best luck.
 
Last edited:
The schematics on the Duncan site specify using a ON-OFF-ON DPDT 3 way switch. I’m away from the house today. Without being there with a meter I can’t offer much help. But you should start with the correct switch. Best luck.
Thanks, I should state that I only installed the bridge PRails. The rest is the Ibanez Jem Jr stuff. The mini toggle is a three position on on on switch. It worked fine for my other humbucker, enabling it to be in series, parallel, and single coil. I'm hoping it would work for this too.
 
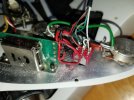
Got it! I had a feeling the black and red was wrong, I checked out the photos again, and moved the black over one terminal. It works now. I like the pickup, it's not as punchy as the stock Ibanez, but it also doesn't have that annoying high mid accentuation of the Seymour Duncan I had before. This is more warm overall.20220810_183256.jpg
 
You have also added the ground wire to the switch .It must be attached to a ground that doesn't change purpose .Put them to the back of a pot.
 
Got it! I had a feeling the black and red was wrong, I checked out the photos again, and moved the black over one terminal. It works now. I like the pickup, it's not as punchy as the stock Ibanez, but it also doesn't have that annoying high mid accentuation of the Seymour Duncan I had before. This is more warm overall.View attachment 106371

So are you splitting to the single or the P90? There are a couple variations on the ON-ON-ON switches. Pretty sure red/green is the single. Glad you got it running.
 
So are you splitting to the single or the P90? There are a couple variations on the ON-ON-ON switches. Pretty sure red/green is the single. Glad you got it running.

I'm splitting to the P90, Single, and Both ( what SDuncan calls Humbucker). I should mention I'm assuming that this is what is going on, because it is acting like my previous humbuckers when I attached them to a three position mini toggle. The issue with the other humbuckers was that they weren't specifically designed for this, which I didn't care about, because I still found it worth it for additional different tones. For example, I have found that the parallel mode fattens up the high strings and is really nice for solos, but I would also keep in mind, that this might be effective because of the way the digital amps respond. All of the samples I've posted here in this forum were of my former humbucker in parallel mode.

For those reading who don't know what parallel output is, it means that the two coils of your pickup are outputting at the same time, in other words one isn't going through the other and then to the output, which is what series is, and which is the default state of most humbuckers.

I'd really like to properly learn what's going on with the electronics. For example, if you look at my hand drawn diagram you'll see a line going from terminal 3 to terminal 6, that was put in by a guitar tech, what is it's purpose?

I'm still not sure if I have the switching totally correct, because Seymour Duncan states that the P rail can be a P90, a single coil, and then both of them together making up a humbucker, which I am assuming means that the P90 and single coil are running in series. I'm also assuming that when Seymour Duncan says for example the pickup is in P90 mode, the single coil would be completely deactivated, this is an assumption on my part. I bring this up because after finishing the wiring yesterday, before putting the guitar back together, I tapped on the pickups with a screwdriver, and toggle position one I could hear the tops were a bit louder on the P90 but the single coil still made sound, then when the single coil with switched to the middle I could hear Buzz immediately which I knew was single coil mode, the single coil when hit with the screwdriver sounded louder, but there were still some sound coming out of the P90, and of course in the final mini toggle position both pickups made sound when tapped with a screwdriver. I was expecting when the mini toggle was in position one for example, for the P90 to make a sound when I tapped on the screws, and for the single coil to not make a sound at all when I tapped on it. I don't know if this is normal or not.
 
https://www.seymourduncan.com/blog/latest-updates/on-on-on-switch

Here’s a link from Duncan describing how on-on-on switches work and what you can do with them. There are links within the article that will lead to other switch types and also P-rail wiring. A typical humbucker in parallel is a cool but it’s thinner and more bright, not as much beef as series. The reason it works well on the P-rail is the coils are mismatched. Normal buckers have matching coils. If you have a meter you can see which type on-on-on switch you have. You could also verify your pickup wiring with resistance checks. Switches are cheap so if you’re in doubt you could just buy a typical DPDT on-off-on switch which is commonly used and easier to figure out.

The other thing is the slug coil which should be the rail is red green. The way the article explains above is the split is to the slug coil, not screw coil which is the P90. The P90 is the best mode available on a P-rail. You can only get 3 modes from a single switch. If I was going to pick one to lose it would be the parallel or single. I like the single on the neck but parallel is better on the bridge.

And make sure your shield wire is wired to ground like @Andy Eagle pointed out, you don’t show it on the drawing.

Thanks a lot for this, I'm going to study all this later. That link is excellent. If the shield wire is silver, I have attached it to terminal 1 in the drawing.
 
Thanks a lot for this, I'm going to study all this later. That link is excellent. If the shield wire is silver, I have attached it to terminal 1 in the drawing.

You also need to run a wire from your shield to the back of a pot or other properly grounded terminal. Or things could get noisy. Since you are inclined to do your own wire work (a good thing!) you should pickup a cheap meter. And a soldering gun for doing the backs of pots if you don’t have one.
 
You also need to run a wire from your shield to the back of a pot or other properly grounded terminal. Or things could get noisy. Since you are inclined to do your own wire work (a good thing!) you should pickup a cheap meter. And a soldering gun for doing the backs of pots if you don’t have one.

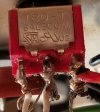
I have to learn how to do this work now, I'm tired of hauling my guitar off to a tech an hour away to do something I'm almost sure I can figure out how to do myself. I have a soldering gun here, I'll pick up a multimeter as it seems to be a useful tool. This is the switch I have.

20220811_130006.jpg
 
I have to learn how to do this work now, I'm tired of hauling my guitar off to a tech an hour away to do something I'm almost sure I can figure out how to do myself. I have a soldering gun here, I'll pick up a multimeter as it seems to be a useful tool. This is the switch I have.

View attachment 106396

Best to have 2 soldering irons. One for tinning wires and landing terminals on pots and switches. And a hotter one for the pot case connections which need more heat and power. Otherwise your joints will look like yours. You’re on your way. Just keep digging in. YouTube is your friend on this. Despite being owned by the evil big G lol.
 
I have to learn how to do this work now, I'm tired of hauling my guitar off to a tech an hour away to do something I'm almost sure I can figure out how to do myself. I have a soldering gun here, I'll pick up a multimeter as it seems to be a useful tool. This is the switch I have.

View attachment 106396
Things I found out over the years:

Get a pencil for small work. Use it most of the time. Only use the gun when the pencil is not big enough to do the job, as you risk melting stuff with a gun.

Do not ever mix use of an iron (pencil/gun) for electronics soldering and other types of soldering, as the flux is different per purpose, and only electronic solder flux should ever touch an iron used for electronics. Acid flux does nasty things to electronics.

Get distilled water to dampen your tip cleaning sponge. Drinking or filtered water has minerals in it that will FUBAR your iron's tip.

Tin your tip first so there is a tiny bit of melted solder on it, as this helps transfer heat into the work more efficiently, decreasing heating time and reducing the chances you will melt something....
 
Thanks a lot guys for the great information.

One thing -
A typical humbucker in parallel is a cool but it’s thinner and more bright, not as much beef as series.

? - Say what, if this is the case all of these years I have been thinking that I was in parallel mode when in fact I was in series. I got it backwards. In what I thought was parallel mode, there was generally way more beef around the high notes and things punched out more. So, I was mistaken this was actually series? LOL! Doh..


This is the soldering gun l have.

Amazon product ASIN B09WJXZSRP
Will this do for a multimeter?

Amazon product ASIN B07SHLS639
 
Last edited:
Thanks a lot guys for the great information.

One thing -


? - Say what, if this is the case all of these years I have been thinking that I was in parallel mode when in fact I was in series. I got it backwards. In what I thought was parallel mode, there was generally way more beef around the high notes and things punched out more. So, I was mistaken this was actually series? LOL! Doh..


This is the soldering gun l have.

Amazon product ASIN B09WJXZSRP

That is a pencil type iron, and should work. Might be a little hot for small stuff. My station is temperature regulated and capable of up to 80W depending on how much heat the item being soldered can sink, because the regulator tries to maintain a temperature. Most of the time it idles at a lower wattage for small stuff like mini toggles. A simple iron will not regulate temperature, so it will idle very hot. Something to be aware of, so try to get in and out quickly before things are too hot for too long, and melt.... Personally, I used 25W and 40W irons before I got the regulated one. A small screwdriver tip is likely a bit easier than a pointy tip for this type of soldering....

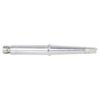
A screwdriver tip looks like this:
download (11).jpeg

Will this do for a multimeter?

Amazon product ASIN B07SHLS639
Should work.

Also, this is not how you hold the iron:
stock-photo-beautiful-woman-repair-soldering-a-printed-circuit-board-204001492-620x1004.jpg
 
Last edited:
No need to get a soldering gun. They're heavy and awkward, and not suited to precision work. A soldering pencil rated at 40 watts or more, with a medium chisel tip, will work great for soldering wires to the back of pots, as well as almost all of your other soldering work. I even use mine for soldering humbucker covers in place. Get a pencil tip for really small work.
 
That is a pencil type iron, and should work. Might be a little hot for small stuff. My station is temperature regulated and capable of up to 80W depending on how much heat the item being soldered can sink, because the regulator tries to maintain a temperature. Most of the time it idles at a lower wattage for small stuff like mini toggles. A simple iron will not regulate temperature, so it will idle very hot. Something to be aware of, so try to get in and out quickly before things are too hot for too long, and melt.... Personally, I used 25W and 40W irons before I got the regulated one. A small screwdriver tip is likely a bit easier than a pointy tip for this type of soldering....

A screwdriver tip looks like this:
View attachment 106418


Should work.

Also, this is not how you hold the iron:
View attachment 106417

lol. Ouch.

The soldering gun or pencil, whatever it is I ordered, is obviously cheap Chinese junk, but you know what, it worked, it comes with 6 different sized tips. It's rated at 60 watts, will the little button with the different numbers adjust the heat? Also I thought the solder was a little thick? I put a triangle tortex pick behind it for contrast.
20220811_163244.jpg

I'm going to order the multimeter right now.
 
Back
Top Bottom