LAYGO
Experienced
This was something I've been wanting to do for awhile, but never had the time to research the necessary items needed. I figured I'd let other FCB users know what was what & how to use the Rocktron RDMH900 MIDI cable (7pin to 5pin w/the power dangle split).
The good thing about this method is that ONLY the FCB is modified. No need to make some funky MIDI, and the cable you will be making is as long or short as you want it & mega simple to make. And it's flexible with the bridge rectifiers to use the factory method of powering the FCB or phantom power or even power with the same AC wall wart used at the back of the Axe-FX.
This mod is specific to the Axe-FX though because of the 7pin side at the Axe-FX & how the power is supplied. It works great for this purpose.
Ingredients:
- FCB (duh)
- Axe-FX (duh)
- Rocktron RDMH900 MIDI cable ($18-$20)
- wall wart, 9v+ AC w/2.5mm plug (I've seen 10v AC to 6v DC), min 500mah (this I've seen consistently though) ($5-$20)
- (2) 2.5mm female power plugs (or 3 plugs if your wall wart needs modifying) ($1.20/each, green circle)
or (1) 2.5mm female tipped 6' of cable ($2.20/each, red/yellow circle) & (1) 2.5mm female tip ($1.20/each, green circle)
- (1) 2.5mm male power receptacle, panel mount ($2.50/each, blue circle)
- (2) bridge rectifier ($1.70/each)
- some wire (12" SHOULD work)
- solder gun
- hot glue gun
- patience
Pictures:
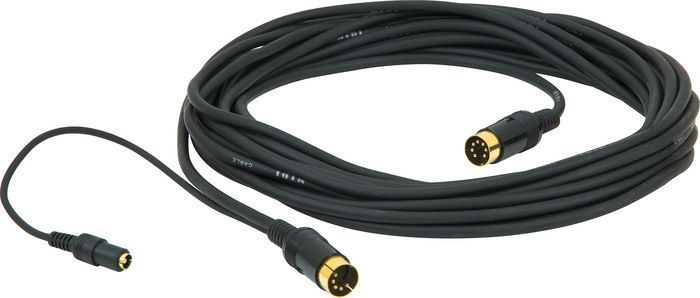
RDMH900:

The different tips:
blue = 2.5mm panel mount male plug
green = 2.5mm female tip
red = 2.5mm female tip with 6' cord

Here's the entire 2.5mm female tip (red) with 6' cord (yellow) (that's feet!):

Here they are all soldered up. When it's all put together, the green is plugged into the RDMH900 & taped together, the blue is mounted to the FCB, and the red plugs into it:

Bridge Rectifier, you need 2 of these & hot glued down to the FCB pcb:

I got a lot of these parts from Altex Electronics, walked in & they had everything. I only needed a 2nd trip because I didn't think of modifying my own wall wart (see below). RDMH900 came from SamAsh w/free shipping on some other purchases I made at same time (Edirol UM2EX works great w/FCB & Axe-FX!).
First & most difficult thing was figuring out how to plug the male end of the RDMH900 into the FCB. The do not make a female panel mount receptacle. There's a couple of options here as well. Cut the male end off the RDMH900, solder a female tip on it, mount a male end on the FCB. Only thing is, if you goof that, it's another $18-$20 RDMH900 cable. What I did was buy the cable that had a 90deg 2.5mm female tip & about 6 foot of wire for $2.50 (yellow & red circle). I cut the tip with about 4" on the end & solder one female tip on the other end. What you end up with is a short cable with 2 female tips, basically a male to male adapter & no modification to the RDMH900.
Another method of connecting the RDMH900 to the FCB would to be just buy the $2.50 cable (yellow & red circle) with 2.5mm on the end. Drill a small hole in the back of the FCB, solder the exposed wires right to the bridge rectifiers, tie a knot in the cord on each side of the hole in the FCB & be done. I preferred the cleaner look of the panel mount male plug vs a dangling cord. They make 2 different kind of panel mounts that I saw btw, one plastic & very much like the 1/4 jacks with the threaded part & bolt on the outside or a metal one, that the threaded part & bolt is on the inside of the FCB. Not hard, not difficult, just snug with the overhang.
Second difficulty is finding a wall wart with the right voltage/amperage *AND* has a 2.5mm plug. I found a perfect one in my house, just didn't have the right plug (12vAC, 500mah). So I ended up buying an extra tip & soldered it on there. There is also the option of walking into Guitar Center & buying a Line 6 power supply ($20) or the 1 Spot w/a Line 6 adapter ($35). Of course there is the multi-tip option, but I didn't really want to spend on any of those options just for power I wasn't ever going unplug/reuse. Altex did have a 9vAC 1000mah plug for $7.50, but it was the 2.1mm tip.
Now, you're cable is ready & the only thing left is to modify the FCB. There are already docs on using the dual bridge rectifers available on the FCB Yahoo group (not the UnO group) on how to modify it w/o a switch using dual Bridge Rectifiers (method one here & method two here). The only difference in the above listed methods is that you'll be soldering the cable from the yellow circled bundle vs trying to solder the MIDI jacks. Note, you won't need all of that bundle, I cut it down to like 12" but it could be trimmed even further.
I could've probably gotten the bridge rectifiers at Altex as well, but I didn't think about that until later. I got my bridge rectifiers at Radio Shack for $1.70 each out the door (Part # 276-1152). They are less than the size of a dime & about the size of a thick button. Also, if you buy the cable with 2.5mm tip, you have all that extra wire you can use to solder the bridge rectifiers together with.
For the unelectrically inclined, it's not really that hard to modify. Although, the dual rectifier method indicated you could use AC or DC supplying power, when I tried to use a DC adapter, it momentarily lit up the FCB & burned up my external bridge rectifier (guessing). When I switched back to the known working AC adapter I had, it wouldn't power up. When I tried powering up via the factory plug, it powered up. A $1.70 lesson on polarity check of the DC plug soldering.
The only modification left is to mount the panel mount plug. Drill a hole large enough to fit the threaded end of the panel mount plug (green circle) through. I didn't have that large of a drill bit to do it in one go, so I used my dremel to finish off sizing the hole.
I did some quick power on tests to make sure the plugs worked directly at the FCB & then via the RDMH900. Worked flawlessly the first time & I could still use the factory plug with the 3 prong cord!
Pictures of the FCB being powered on by the RDMH900 & factory plug forthcoming. I need to redo my burnt up bridge rectifier!
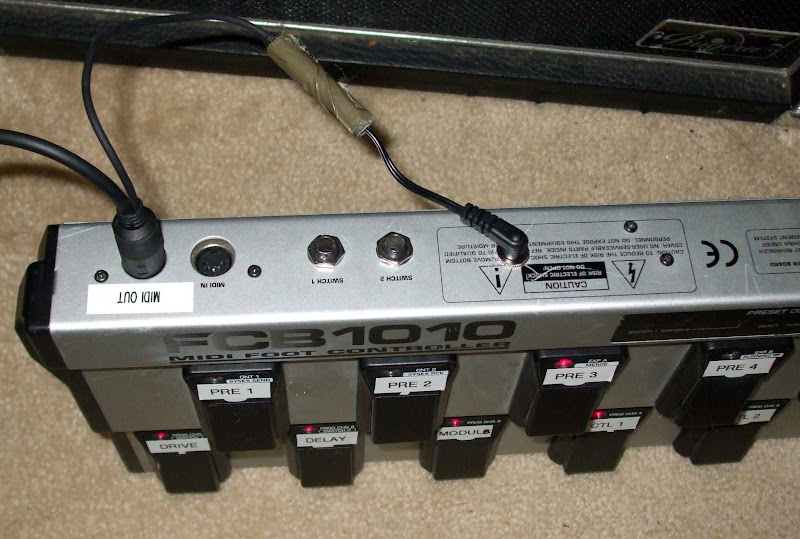
Notice the lack of the factory power plug. Underneath the tape is the female power plug (green circle from above) plugged in to the RDMH900. Plugged into the FCB itself is the end of the 6' cable (red circle from above) plugged into the panel mount power receptacle (blue circle from above):
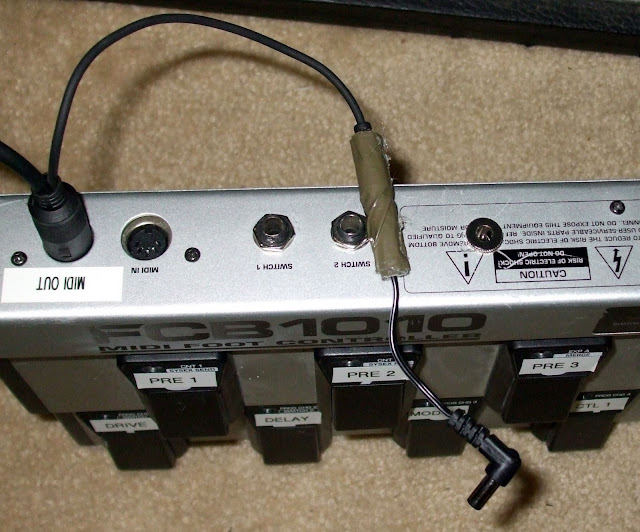
Shot of it powered on with the plug in:
Shot of it powered off with the plug out:
The good thing about this method is that ONLY the FCB is modified. No need to make some funky MIDI, and the cable you will be making is as long or short as you want it & mega simple to make. And it's flexible with the bridge rectifiers to use the factory method of powering the FCB or phantom power or even power with the same AC wall wart used at the back of the Axe-FX.
This mod is specific to the Axe-FX though because of the 7pin side at the Axe-FX & how the power is supplied. It works great for this purpose.
Ingredients:
- FCB (duh)
- Axe-FX (duh)
- Rocktron RDMH900 MIDI cable ($18-$20)
- wall wart, 9v+ AC w/2.5mm plug (I've seen 10v AC to 6v DC), min 500mah (this I've seen consistently though) ($5-$20)
- (2) 2.5mm female power plugs (or 3 plugs if your wall wart needs modifying) ($1.20/each, green circle)
or (1) 2.5mm female tipped 6' of cable ($2.20/each, red/yellow circle) & (1) 2.5mm female tip ($1.20/each, green circle)
- (1) 2.5mm male power receptacle, panel mount ($2.50/each, blue circle)
- (2) bridge rectifier ($1.70/each)
- some wire (12" SHOULD work)
- solder gun
- hot glue gun
- patience
Pictures:
RDMH900:
The different tips:
blue = 2.5mm panel mount male plug
green = 2.5mm female tip
red = 2.5mm female tip with 6' cord
Here's the entire 2.5mm female tip (red) with 6' cord (yellow) (that's feet!):
Here they are all soldered up. When it's all put together, the green is plugged into the RDMH900 & taped together, the blue is mounted to the FCB, and the red plugs into it:
Bridge Rectifier, you need 2 of these & hot glued down to the FCB pcb:
I got a lot of these parts from Altex Electronics, walked in & they had everything. I only needed a 2nd trip because I didn't think of modifying my own wall wart (see below). RDMH900 came from SamAsh w/free shipping on some other purchases I made at same time (Edirol UM2EX works great w/FCB & Axe-FX!).
First & most difficult thing was figuring out how to plug the male end of the RDMH900 into the FCB. The do not make a female panel mount receptacle. There's a couple of options here as well. Cut the male end off the RDMH900, solder a female tip on it, mount a male end on the FCB. Only thing is, if you goof that, it's another $18-$20 RDMH900 cable. What I did was buy the cable that had a 90deg 2.5mm female tip & about 6 foot of wire for $2.50 (yellow & red circle). I cut the tip with about 4" on the end & solder one female tip on the other end. What you end up with is a short cable with 2 female tips, basically a male to male adapter & no modification to the RDMH900.
Another method of connecting the RDMH900 to the FCB would to be just buy the $2.50 cable (yellow & red circle) with 2.5mm on the end. Drill a small hole in the back of the FCB, solder the exposed wires right to the bridge rectifiers, tie a knot in the cord on each side of the hole in the FCB & be done. I preferred the cleaner look of the panel mount male plug vs a dangling cord. They make 2 different kind of panel mounts that I saw btw, one plastic & very much like the 1/4 jacks with the threaded part & bolt on the outside or a metal one, that the threaded part & bolt is on the inside of the FCB. Not hard, not difficult, just snug with the overhang.
Second difficulty is finding a wall wart with the right voltage/amperage *AND* has a 2.5mm plug. I found a perfect one in my house, just didn't have the right plug (12vAC, 500mah). So I ended up buying an extra tip & soldered it on there. There is also the option of walking into Guitar Center & buying a Line 6 power supply ($20) or the 1 Spot w/a Line 6 adapter ($35). Of course there is the multi-tip option, but I didn't really want to spend on any of those options just for power I wasn't ever going unplug/reuse. Altex did have a 9vAC 1000mah plug for $7.50, but it was the 2.1mm tip.
Now, you're cable is ready & the only thing left is to modify the FCB. There are already docs on using the dual bridge rectifers available on the FCB Yahoo group (not the UnO group) on how to modify it w/o a switch using dual Bridge Rectifiers (method one here & method two here). The only difference in the above listed methods is that you'll be soldering the cable from the yellow circled bundle vs trying to solder the MIDI jacks. Note, you won't need all of that bundle, I cut it down to like 12" but it could be trimmed even further.
I could've probably gotten the bridge rectifiers at Altex as well, but I didn't think about that until later. I got my bridge rectifiers at Radio Shack for $1.70 each out the door (Part # 276-1152). They are less than the size of a dime & about the size of a thick button. Also, if you buy the cable with 2.5mm tip, you have all that extra wire you can use to solder the bridge rectifiers together with.
For the unelectrically inclined, it's not really that hard to modify. Although, the dual rectifier method indicated you could use AC or DC supplying power, when I tried to use a DC adapter, it momentarily lit up the FCB & burned up my external bridge rectifier (guessing). When I
switched back to the known working AC adapter I had, it wouldn't power up. When I tried powering up via the factory plug, it powered up. A $1.70 lesson on polarity check of the DC plug soldering.The only modification left is to mount the panel mount plug. Drill a hole large enough to fit the threaded end of the panel mount plug (green circle) through. I didn't have that large of a drill bit to do it in one go, so I used my dremel to finish off sizing the hole.
I did some quick power on tests to make sure the plugs worked directly at the FCB & then via the RDMH900. Worked flawlessly the first time & I could still use the factory plug with the 3 prong cord!
Pictures of the FCB being powered on by the RDMH900 & factory plug forthcoming. I need to redo my burnt up bridge rectifier!
Notice the lack of the factory power plug. Underneath the tape is the female power plug (green circle from above) plugged in to the RDMH900. Plugged into the FCB itself is the end of the 6' cable (red circle from above) plugged into the panel mount power receptacle (blue circle from above):
Shot of it powered on with the plug in:
Shot of it powered off with the plug out: