SOAWM
Inspired
Since day one I wanted to label my MFC, but unfortunately I could never wrap my head around how I would layout my presets, IA-switches and scenes. Therefore I always thought it was rather stupid to buy a pre-made label set, as I wasn't sure whether I'd use all of them. The labelmakers on this forum provide excellent quality and design for a more than honest price, but I'm more of a DIY kind of guy (see my homemade pedalboard, patchbay,...)
I'd like to share with you the process of making my own labels. At the moment I'm still designing in photoshop and waiting for some supplies. So the labels are far from finished, so this thread will be updated regularly.
List of materials used/ordered
- Matte Photopaper
- Magnetic paper with self-adhesive side for attaching the labels
- Lamination machine
- Scissors
- Inkjet Printer
- Hobby Knife
- Ridiculous amounts of patience... time will tell whether I have it
STEP 1: Designing the labels
First of all I need to admit that I'm absolutely not good in Photoshop, so my designs may not be that fancy as the labels you can buy. The designs aren't final and need further tweaking, so all suggestions are more than welcome.
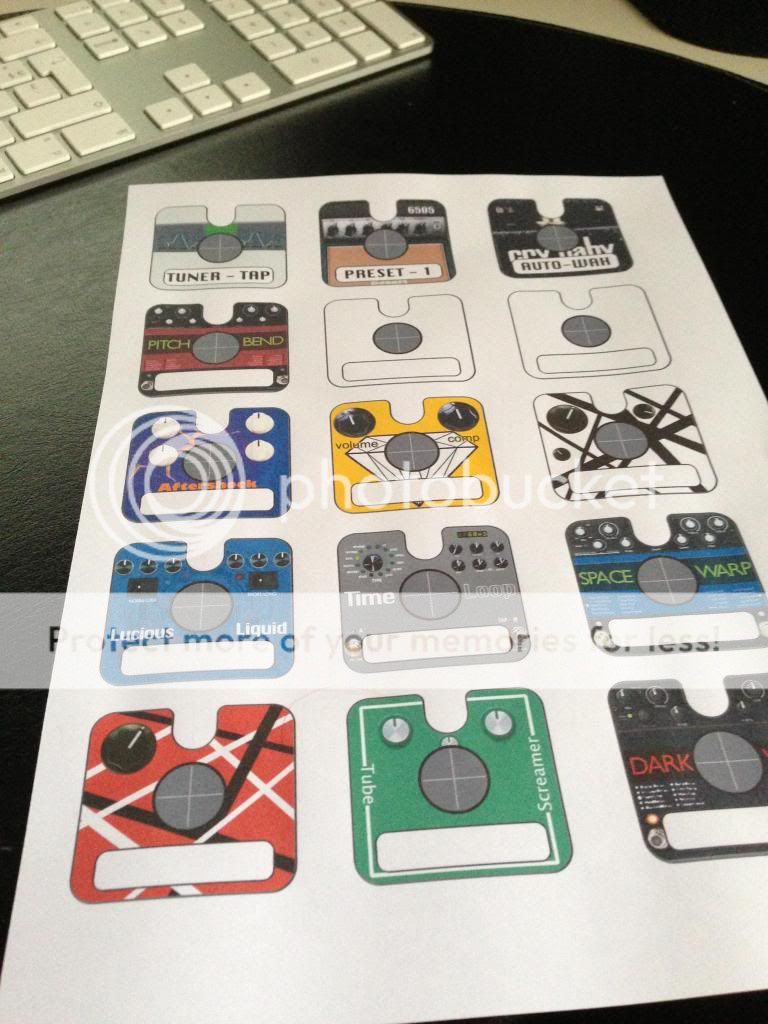
Here's a picture of some labels I designed and printed out on regular paper. The picture may not be that clear, but I didn't upload a picture from photoshop as I used the layout of existing pedals... And I won't share them without permission!
As you can see I made three labels based on the Eventide pedals (Timefactor, Pitchfactor and Space). I also tried to make a Strymon Timeline like label for another delay. The compressor is based on the yellow Diamond Compressor (I added the diamond). The Chorus is based on the H20 and the auto-wah has a modified picture of a Crybaby. The Phaser, Flanger and Tubescreamer I have build from scratch in Photoshop, but I think it's clear on what pedals they are based. The Preset 1 label has a 6505 and a Bogner Cab on it, as this is my go-to setup in the Axe-Fx.
Once the labels are finished, I will post high quality pictures of the labels!
I'd like to share with you the process of making my own labels. At the moment I'm still designing in photoshop and waiting for some supplies. So the labels are far from finished, so this thread will be updated regularly.
List of materials used/ordered
- Matte Photopaper
- Magnetic paper with self-adhesive side for attaching the labels
- Lamination machine
- Scissors
- Inkjet Printer
- Hobby Knife
- Ridiculous amounts of patience... time will tell whether I have it
STEP 1: Designing the labels
First of all I need to admit that I'm absolutely not good in Photoshop, so my designs may not be that fancy as the labels you can buy. The designs aren't final and need further tweaking, so all suggestions are more than welcome.
Here's a picture of some labels I designed and printed out on regular paper. The picture may not be that clear, but I didn't upload a picture from photoshop as I used the layout of existing pedals... And I won't share them without permission!
As you can see I made three labels based on the Eventide pedals (Timefactor, Pitchfactor and Space). I also tried to make a Strymon Timeline like label for another delay. The compressor is based on the yellow Diamond Compressor (I added the diamond). The Chorus is based on the H20 and the auto-wah has a modified picture of a Crybaby. The Phaser, Flanger and Tubescreamer I have build from scratch in Photoshop, but I think it's clear on what pedals they are based. The Preset 1 label has a 6505 and a Bogner Cab on it, as this is my go-to setup in the Axe-Fx.
Once the labels are finished, I will post high quality pictures of the labels!
Last edited: