Midi Raider with Axe FX II (Mark II)

3GMusic

New Member
Well, it's tail between the legs time...
I just got a Midi Raider and had hoped to set it up thusly:
[1] Bank mode, Bank 1 bottom row switches (1-5) select Axe presets 1 - 5
UP press sets the bottom row to presets 6-10 , etc..
For each bank
[2] the second row 6-10 switches (instant access) represent Axe Scenes 1-5 for the selected preset
[3] the third row 11-15 switches (instant access) globally activate/bypass 5 specific FX I use the most (e.g., drive, delay...) of the currently selected preset.

I didn't find that many existing threads but went through what I saw, tried a lot of different combinations of settings and am still stuck at trying to get the row 2 functionality.
The Axe "midi received" light flashes but nothing happens.

I know there are a lot of variables involved but I'm hoping that someone knows
A) whether my intended setup is even possible and, if so
B) where there are use cases or detailed documentation that I could follow A-Z to troubleshoot.

I have to say my first impressions of Rocktron as a company are disappointing.
Their site contains (as far as I could tell) only their manual. No additonal tech info, forum... :(
Their "support" web page mentions emailing techsupport@rocktron.com but that email bounced.
I saw another reference to rocktronusa.com but that also failed.
Their Contact page indicates techsupport@ghsstrings.com...which kinda threw me, but...okay.
That bounced as well.
There is a web form and a couple of personal emails I'll try but my expectations at this point are minimal.

If I can just find detailed working examples (required settings on the Axe as well as the Raider) I can most likely work it out.

Any clues will be most gratefully accepted.

-G
 
See this post I made the earlier today:

https://forum.fractalaudio.com/thre...ned-with-midi-mapping-bug.201469/post-2517828

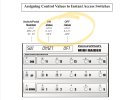
In order to do that on the Midi Raider (after scanning the manual here: https://www.rocktronusa.com/uploads/2/2/2/5/22258814/midi_raider_manual_r4.pdf) you can see how to assign the data values (as per my post above) on page 35:

9C5E4E03-A473-466F-9948-6D78CCD6D0F2.jpeg

Set the OFF value to OFF. Set the ON value as I mentioned in the post.

It doesn't sound like it supports switch groups or mutually exclusive switches so one challenge will be that the scene switch LEDs will stay lit after you press the switch even when you select another switch.
 
Thanks for the input!
After I found the right email address I had a very helpful exchange with Rocktron.
I had thought the instant access switches would send CC# and value, but they are, in fact, just on/off capable.
I just needed to reroute my thinking on this.
It will take some Axe re-organizing but it'll be manageable.
The manual page I grabbed the image from shows setting the values for on and off switch presses. That should do what you need... Unless the manual is wrong?
 
Thanks unix - I've made good headway.
I'm sure the manual is accurate - but those diagrams are examples and the actual values need to be whatever the Axe is expecting.
In my case the ON is 127; the OFF is 0.
Their manual is, as manuals go and as far as it goes, very straightforward and understandable; I just would have liked to have some use cases and more detailed examples. I realize it would be unreasonable to expect details ( source -> target params and values ) for every device that can be controlled by the thing, but doing that, at least for the major players, would be doable and certainly a great help to end-users.
I forgot to ask them if software version 1.00 (which displays on my unit during boot-up) is actually the latest. I didn't see any firmware-type downloads mentioned and the thing has been around for quite some time...but hey - maybe they got it right the first time! :)
Appreciate your help~
 
Well, it's tail between the legs time...
I just got a Midi Raider and had hoped to set it up thusly:
[1] Bank mode, Bank 1 bottom row switches (1-5) select Axe presets 1 - 5
UP press sets the bottom row to presets 6-10 , etc..
For each bank
[2] the second row 6-10 switches (instant access) represent Axe Scenes 1-5 for the selected preset
[3] the third row 11-15 switches (instant access) globally activate/bypass 5 specific FX I use the most (e.g., drive, delay...) of the currently selected preset.

I didn't find that many existing threads but went through what I saw, tried a lot of different combinations of settings and am still stuck at trying to get the row 2 functionality.
The Axe "midi received" light flashes but nothing happens.

I know there are a lot of variables involved but I'm hoping that someone knows
A) whether my intended setup is even possible and, if so
B) where there are use cases or detailed documentation that I could follow A-Z to troubleshoot.

I have to say my first impressions of Rocktron as a company are disappointing.
Their site contains (as far as I could tell) only their manual. No additonal tech info, forum... :(
Their "support" web page mentions emailing techsupport@rocktron.com but that email bounced.
I saw another reference to rocktronusa.com but that also failed.
Their Contact page indicates techsupport@ghsstrings.com...which kinda threw me, but...okay.
That bounced as well.
There is a web form and a couple of personal emails I'll try but my expectations at this point are minimal.

If I can just find detailed working examples (required settings on the Axe as well as the Raider) I can most likely work it out.

Any clues will be most gratefully accepted.

-G
I had been using a Midi Raider with my Axe-fx III up until just recently, as I switched to an FC-12. I previously used it with an Axe-fx II as well. I still have it, but haven't gotten around to selling it yet.

I had it set up similar to what you're describing. I don't remember having to change anything in the Midi Raider at all. The easiest way I found to get everything to work was to map the switches to external controllers using the learn function in the Axe (so you don't have to reprogram the values in the Midi Raider). Then in the preset, set the bypass for each effect to specific external controllers. For example, if switch 6 is mapped to external controller 1 and you want that to be Drive 1, set the bypass state in Drive 1 in the preset to External controller 1. Etc...
The only problem is that you'd have to set the bypass state for all effects like this, so it could be time consuming depending on how many presets you use.

I had a few switches dedicated to Scene 2-4. I had them set so that if I bypassed any of them, it would revert back to scene 1. It might be the scene revert setting. Scene 1 could also be reset by just hitting the preset switch in the bottom row. It ended up saving me a switch.

Feel free to PM me if you need further help and I can try to figure out more about how I had it set up. Unfortunately, when I got the FC-12, I reset my system settings, so I don't have them saved anymore.
 
I had a few switches dedicated to Scene 2-4. I had them set so that if I bypassed any of them, it would revert back to scene 1. It might be the scene revert setting. Scene 1 could also be reset by just hitting the preset switch in the bottom row. It ended up saving me a switch.
Most likely you had the scene switches set with an off value of 0 which equates to scene 1.

And also sounds like you had your Default Scene set to 1.

Scene Revert is not related to what the switches do...
 
Most likely you had the scene switches set with an off value of 0 which equates to scene 1.

And also sounds like you had your Default Scene set to 1.

Scene Revert is not related to what the switches do...
I think you're right. That sounds familiar. I couldn't remember what I did to get it to work since I'm using the FC-12 and reset everything, but that sounds like it.
 
Back
Top Bottom