Hey everyone,
Sorry for the long write-up, but I hope some of you might find the details of this rebuild useful.
I wanted to share my latest FM3 pedalboard update. Over time, I realized a few things in my old setup were starting to bother me.
What I got tired of…
- The Templeboard.
It’s a great board — I really loved it — but the combined height of the Templeboard and the FM3 made it almost impossible to find a proper gig bag. Also, I never liked the expression pedal angle.
- The external dual footswitch.
I could never get used to it. No matter where I placed it, it always felt like an awkward add-on. I even printed a 3D riser so it would match the FM3 switch height, but it still felt out of place. The extra holes on the board are a reminder of all the configurations I tried.
Another thing that frustrated me was the button configuration. Fractal did an amazing job making the footswitches so flexible, but that same flexibility sometimes got in my way. When switching from clean to dirty sounds, my foot would occasionally stay on the switch longer than intended, activating the
hold function and throwing me into the Master Layout unexpectedly. Suddenly I couldn’t see my scenes anymore — and yes, mild panic followed.
So I decided to rebuild the whole thing:
- Custom-made pedalboard.
I had a new pedalboard built to my specs — just 1 cm tall, enough to route cables underneath, lift it slightly from the floor, and still keep the overall profile low enough to fit in a gig bag together with the FM3.
- 4-button MIDI footswitch.
I normally use up to four scenes per song, so having one switch per scene feels the most natural to me. I went with the Hotone Ampero Control — not the most comfortable spacing between buttons, but it’s solidly built and very easy to program.
- Compact expression pedal.
After struggling with the DOD Mini (loose parts, slipping gears, endless adjustments), I switched to the Boss EV-30. It’s solid, compact, and mounted with Dual Lock, so I can replace it easily if needed.
- Wireless integration.
I added a Boss WL-60, which runs on AA batteries. The issue is that it powers on automatically when the output jack is connected, and on a pedalboard, that’s not practical. To solve this, I added an on/off switch so I can keep the jack plugged in and still control power manually. It’s secured with a small bungee cord instead of velcro — much more durable when you need to remove it frequently to change batteries.
- Power for the MIDI controller.
To feed the MIDI controller with power, from the Faslink, I modded an XLR cable with a 3D-printed low-profile cap and soldered it to a DC jack. The controller accepts 9–18 V, so no step-down board or extra circuitry was needed.
Both the FM3 and the MIDI pedal are screwed directly into the new custom board (using the original FM3 screws; I had to drill the MIDI pedal for mounting).
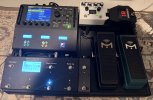
Current layout:
- The 4 MIDI switches are dedicated to scenes 1–4.
- The FM3 switches handle navigation and utilities:
- Tap = Toggles between Scene 1 and 1. Mini label always shows the active scene name.
- Tap = None / Hold = Master Layout.
- Tap = Tempo / Hold = Tuner.
I also increased the HOLD delay to prevent accidental triggers during songs.
Now I’m genuinely happy with this setup. It’s compact, efficient, and feels intuitive to play.
View attachment 161077View attachment 161078View attachment 161079


") Great to know if the battery in my B8 starts to not hold charge - I'll open it up as well...
Great to know if the battery in my B8 starts to not hold charge - I'll open it up as well...