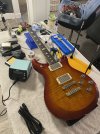
PRS shopping today - I picked one!

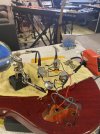
My 58/15 LT pups arrived today. Opened up my S2 to see what’s what. Debating if I should get one of Jonesyblues handwired harnesses to throw in here while I’m at it. I believe these S2’s all have the SE electronics. Prs has some interesting wiring colors /setup also I’m just realizing. Thoughts?….
 

Attachments

  • IMG_9665.jpeg
    IMG_9665.jpeg
    2.1 MB · Views: 30
Debating if I should get one of Jonesyblues handwired harnesses to throw in here while I’m at it. I believe these S2’s all have the SE electronics. Prs has some interesting wiring colors /setup also I’m just realizing. Thoughts?….
Depends. If you’re ok with modifying the factory wiring, I’d toss the pickups in first to make sure you like them.
 
I’m still studying the wiring. I was hoping it’d be straightforward as I was just going from the same set of 58/15 from the S to the LT core but the wiring is different on the LT’s. Red/black green + braided/cloth for bridge and neck: red/green/white + braided/cloth. The existing S pickups are not the same from what I can tell(certainly no braided /cloth wires there for example. so I can’t just swap wire for wire as I was hoping.

I’m pretty sure about the LT color diagram as this:
Treble pickup:
cloth wire - hot
red/black - soldered together and to push/pull contact for coil split
green/braided shield - ground

Neck Pickup:
cloth wire - hot
green/white - soldered together and to push/pull contact for coil split
red/braided shield - ground
Talk to PRS, bet they'll help you get oriented.
 
I just found out about this guitar shop not long ago. Pretty much only shop in town that carries Knaggs but the prices-holy mother of Mary.
Yep. Supposed to be CS guitars, theres the CS tag lol. Which makes the 5k used ones look like a steal.

They deal Dunable and unlike axe and you shall receive will actually accept an offer haha.
 
Yep. Supposed to be CS guitars, theres the CS tag lol. Which makes the 5k used ones look like a steal.

They deal Dunable and unlike axe and you shall receive will actually accept an offer haha.
The only Knaggs dealer around here had the same one unspectacular but still expensive one in stock for a long time, and right now has none.

It's ok, can't afford one anyway.
 
I'm talking to my guy Jonesyblues about doing a harness. I'm thinking 50's wiring. similar controls to the standard 594 layout for the push/pull pots and some luxe bumblebee PIO .022uf caps
 
I think i may just bypass a new wiring harness and try first installing the new LT pickups to existing stock wiring harness. I've added the pic as reference for the existing wiring. Can the nerds around here confirm /verify I have things sorted out correctly. First I'll list what I see along with my assumptions for what the connections are...followed by the new LT pickups and how it would connect to match up. The color scheme from the S and the LT differ slightly along with the obvious difference that the LT's have a braided cloth wire along with 3 plastic coated wires.

'S' Neck pickup (pic)
Skinny black = hot. connects to Neck Volume pot (1st lug)
the thicker black and red are soldered to top of neck Tone. I assume both= ground?
Skinny white/green together (for split) to Tone pot.

'S' Bridge pickup (pic)
white = hot. connects to Bridge Volume pot (1st lug)
green and thicker black both= 'ground' soldered top of Bridge Tone pot.
skinny black and red together to Bridge Tone pot.

The 58/15 LT pickups i have each have 3 plastic coated wires along with a shielded cloth. I just want to connect things back to the corresponding locations as the S pickups were.
note: the 3 plastic coated wires between neck and bridge are not the same but i have pretty much verified what they are so assuming that is correct....

LT Neck pickup:
cloth wire = hot? connect to Neck Volume pot (1st lug?)
the braided shield of this wire just solder to the back of the neck Volume Pot?
Green and White plastic wires soldered together (for split) to Tone pot
Red=ground and perhaps just soldered top of neck Tone pot?

LT Bridge Pickup:
cloth wire = hot? connect to Bridge Volume pot (1st lug?)
braided shield of this wire solder back of Bridge Volume pot?
red and black plastic wires soldered together (for split) to Tone pot
Green=ground and solder top of Bridge Tone pot?
 

Attachments

  • 594 wiring old.jpg
    594 wiring old.jpg
    2.6 MB · Views: 6
What's the jigger at the end of the table for? Courage? :)
I actually use it for screws or little bits that i remove. Interesting in that the Volume and Tone pots are not the same size shafts. Wasn't expecting that. Making use of these robot helper arms - decided to take harness out to make access much easier. Not sure how else I'd manage with my big mitts in the wayPRS PROJECT1.jpg
 
Your collection of tools is very much like mine.

I collect the little neodymium magnets that fancy companies use on their product boxes to close the lids. They're really useful in the bottom of something like the jigger to hold everything in one place in case it gets knocked over or something wants to bounce out when I drop it in. Not that I've ever done that. Ever.

The last time I started wiring a harness I stole an idea from one of the pre-wired harness companies and poked holes in a piece of cardboard that matched the mounting holes for the pots and switches, then worked from it for as long as I could, then transferred them into the cavity. I felt like the finish of the guitar was safer from scratches or accidentally dropping molten solder or touching it with the soldering iron. Not that I've ever done that either. Ever. :)
All good tips.

What sort of fancy stuff has magnetic box lids?
 
keeping it all semi together outside the cavity is finicky for sure. I nearly got things twisted /reversed around when a pot loosened from clamp and if it weren't for pics i took earlier for reference I may have already screwed that up. Little jig like those prewired harnesses would be much easier. Cardboard. good idea
 
I collect the little neodymium magnets that fancy companies use on their product boxes to close the lids. They're really useful in the bottom of something like the jigger to hold everything in one place in case it gets knocked over or something wants to bounce out when I drop it in. Not that I've ever done that. Ever.

...and then no matter how much I scramble around looking for that damn screw, I can't find it. So, I got this:

Amazon product ASIN B000HYL20G
 
Back
Top Bottom