bleujazz3
Fractal Fanatic
Heads-up, @DaveO...
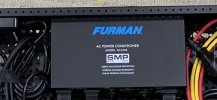
Am resurrecting your post regards the Furman AC-215A...this one...
https://forum.fractalaudio.com/threads/best-add-ons-for-your-fm9.182461/post-2247997
Your FX board inspired me to upgrade my homemade AC circuit box (its electrical wiring/tape integrity has degraded over the summer) to the Furman AC-215A.
If possible, tell me, how did you attach the AC-215A to your Temple board? I see that there are included attachment brackets, but I've not looked into the wrapped bag that contains them yet. How "easy" was it to install the Furman?
The left underside of my Duo 34 is already well-populated with 2 stand-in switches and an EV-1. Might it be possible to position the AC-215A between my stand-in switches? (Will need to estimate distance and measure first, am sure about that).
Will need to disassemble the AC circuit box first. Could use some mojo here...


