RevDrucifer
Fractal Fanatic
I like to tinker with stuff and enjoy the learning process when it comes to stuff I haven't done before. Figured I'd post it up here in case anyone wanted to go through the process of building a couple switches for their FC. It's a stupidly easy project. I can turn a solder iron into a wrecking ball just by looking at it, but it's something I've really wanted to get better with and I think I did a pretty tight job with these. It's also cheap!
Parts-
Enclosures
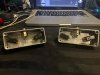
I figured these would be the perfect size as I was pretty sure that's what I've seen others have on their boards and the ones you see pop up on Amazon. They are indeed a perfect size (I've got a size 13 foot, no problem hitting them directly) The step drill came in handy.
Footswitches
Nice and smooth, not much to say about them. They're switches.
Stereo Jack
I didn't end up using this wire as it was too thick. Had some left over from a pickup wiring harness and used that instead. MUCH easier to work with.

I just eyed everything out instead of measuring. I knew I'd ballpark it close enough. They aren't perfect, but I can barely notice standing above them.

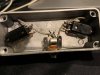
Dry fit from the inside- Angling the footswitches gave better access with the solder iron and put some distance between them and the jack.

I figured it'd be smarter to wire the grounds before fixing it in place, the least amount of soldering I had to do in the box, the better. Wrecking balls don't fit in these.

(If you're using the Pure Tone jack, the ground is the smaller, square prong)
Since I normally can't be trusted with a solder iron, I actually wanted to do a good job to show myself I could. A pep-talk with a hot iron did the trick.

After that it's just finishing the last two wires and Bob's your uncle.


Done!

(Those aren't drug baggies, I SWEAR)
Tested them out with the Looper layout (first time I used the Looper, too) and they're both working great. Later this week I'm building a pedalboard. It'll be an easy one, just a flat board with the aluminum edging and some handles, but I'll throw up a how-to for that. I've realized along the way some people might be more inclined to build something on their own, instead of paying for it, if they see how easily it can be done (and cheap!).
Hope this helps for any of you considering doing it on your own. It's simple enough you can't really screw it up, but challenging enough with the tight wiring that you'll feel good about pulling it off after. And who doesn't like to pat themselves on the back every now and then?
These will be used for Tuner/Tap and Bank Up/Down. I haven't thought about their Hold functions yet. I'm building a single momentary switch to turn my Digitech Freqout on and off as I use it so much I don't want it taking up it's own footswitch on my FC6. It's basically doing this, but half!
Parts-
Enclosures
I figured these would be the perfect size as I was pretty sure that's what I've seen others have on their boards and the ones you see pop up on Amazon. They are indeed a perfect size (I've got a size 13 foot, no problem hitting them directly) The step drill came in handy.
Footswitches
Nice and smooth, not much to say about them. They're switches.
Stereo Jack
I didn't end up using this wire as it was too thick. Had some left over from a pickup wiring harness and used that instead. MUCH easier to work with.
I just eyed everything out instead of measuring. I knew I'd ballpark it close enough. They aren't perfect, but I can barely notice standing above them.
Dry fit from the inside- Angling the footswitches gave better access with the solder iron and put some distance between them and the jack.
I figured it'd be smarter to wire the grounds before fixing it in place, the least amount of soldering I had to do in the box, the better. Wrecking balls don't fit in these.
(If you're using the Pure Tone jack, the ground is the smaller, square prong)
Since I normally can't be trusted with a solder iron, I actually wanted to do a good job to show myself I could. A pep-talk with a hot iron did the trick.
After that it's just finishing the last two wires and Bob's your uncle.
Done!
(Those aren't drug baggies, I SWEAR)
Tested them out with the Looper layout (first time I used the Looper, too) and they're both working great. Later this week I'm building a pedalboard. It'll be an easy one, just a flat board with the aluminum edging and some handles, but I'll throw up a how-to for that. I've realized along the way some people might be more inclined to build something on their own, instead of paying for it, if they see how easily it can be done (and cheap!).
Hope this helps for any of you considering doing it on your own. It's simple enough you can't really screw it up, but challenging enough with the tight wiring that you'll feel good about pulling it off after. And who doesn't like to pat themselves on the back every now and then?
These will be used for Tuner/Tap and Bank Up/Down. I haven't thought about their Hold functions yet. I'm building a single momentary switch to turn my Digitech Freqout on and off as I use it so much I don't want it taking up it's own footswitch on my FC6. It's basically doing this, but half!