Replaced Stock Fan In My Early Axe-Fx III - Results Are Very Impressive

Warrior

Power User
I moved my Axe-FX III out of a rack case and put it on my desk. Never noticed the fan noise until I did this.
I read some of the early Axe-FX III's may have had the screws a little too tight and the good results with people replacing their stock fans with the Noctua NF-A8 ULN fan so I gave it a try.

I'm blown away by the results.
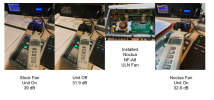
Screen Shot 2021-04-07 at 6.40.31 AM.png
 
I’ve had my III fan replaced once already by the good folk at FAS, and am still dissatisfied with the noise (in my current config, it is racked in an open rack near my head ). Just purchased one of these and is arriving tomorrow. However, Ihave zero soldering skill or equipment, so I will have to find someone handier than than me to help if that is required...Is it?
I moved my Axe-FX III out of a rack case and put it on my desk. Never noticed the fan noise until I did this.
I read some of the early Axe-FX III's may have had the screws a little too tight and the good results with people replacing their stock fans with the Noctua NF-A8 ULN fan so I gave it a try.

I'm blown away by the results.

View attachment 81208
 
I’ve had my III fan replaced once already by the good folk at FAS, and am still dissatisfied with the noise (in my current config, it is racked in an open rack near my head ). Just purchased one of these and is arriving tomorrow. However, Ihave zero soldering skill or equipment, so I will have to find someone handier than than me to help if that is required...Is it?
No, it's just a PIN connector. Easy swap. I bought a Noctua NF-A8 5V months ago, but hadn't the time to install it ...
My AxeFX is also very noisy.
 
No soldering required. Very easy to do.
You'll only need a Phillips head screwdriver & a pair of needle-nose or regular pliers.
  1. Remove the screws to the cover
  2. Disconnect the PIN connector for the fan
  3. Remove the 4 screws holding the fan plate (with fan on it) to the board.
  4. Remove the 4 nuts holding the fan itself to the fan plate.
  5. Remove the fan & then remove the factory rubber grommets in the plate holes by pinching one side as you pull on the other side - pulling it through the hole.
  6. Install the new fan on the fan plate. You won't be using any screws to fasten the new fan to the plate. There are rubber "spikes" that you will position through the plate holes. You need to press on the fan housing while you pull the spikes to get the housing seated all the way onto the plate. You'll feel it kind of lock in.
  7. Then reinstall the plate to the board and connect the PIN connector.
  8. Put cover back on.

    This post helped me a lot.
    https://forum.fractalaudio.com/threads/fan-noise.149521/post-2030718
thanks lots!
 
No, it's just a PIN connector. Easy swap. I bought a Noctua NF-A8 5V months ago, but hadn't the time to install it ...
My AxeFX is also very noisy.
The stock fan is 12V, so you may have some issues running a 5V fan on the same power (i.e., Noctua specifically says a 5V fan can be damaged by a 12V header).
 
I'm blown away by the results.
steviewonder.jpg
 
I went down a little bit of a rabbit hole this morning trying to compare fan specs...the JF0815-1L is the Axe-FX III stock fan.

Note that Noctuas are considered top-tier for PC building, albeit pricey. They do come with the "low noise" adapters referenced below (they're basically inline voltage dividers, I believe).

zKjZkSS.png
 
Last edited:
I moved my Axe-FX III out of a rack case and put it on my desk. Never noticed the fan noise until I did this.
I read some of the early Axe-FX III's may have had the screws a little too tight and the good results with people replacing their stock fans with the Noctua NF-A8 ULN fan so I gave it a try.

I'm blown away by the results.

I never noticed the fan noise until I had a silent PC built. The stock fan isn't loud at all, but it's noticeable in an otherwise silent room.
 
But to be honest 39db is extremely quiet. It's noticeable next to my watercooled PC but my Yamaha FRFR wedge sounds like a jet engine in comparison, although also pretty quiet
 
I installed an AC blower in my Axe Fx III and it runs ice cold now.

(thanks for the post btw. It sorta seems like changing out the heat sink on a desktop computer).
 
Since I had good luck with replacing the fan when I had the Axe II, I was going to make the change on the III as well. Before I did, I happened to need a new power amp, and while it’s a great amp, the Matrix I bought has a really loud fan, making a fan change on the III useless.....lol.
 
No soldering required. Very easy to do.
You'll only need a Phillips head screwdriver & a pair of needle-nose or regular pliers.
  1. Remove the screws to the cover
  2. Disconnect the PIN connector for the fan
  3. Remove the 4 screws holding the fan plate (with fan on it) to the board.
  4. Remove the 4 nuts holding the fan itself to the fan plate.
  5. Remove the fan & then remove the factory rubber grommets in the plate holes by pinching one side as you pull on the other side - pulling it through the hole.
  6. Install the new fan on the fan plate. You won't be using any screws to fasten the new fan to the plate. There are rubber "spikes" that you will position through the plate holes. You need to press on the fan housing while you pull the spikes to get the housing seated all the way onto the plate. You'll feel it kind of lock in.
  7. Then reinstall the plate to the board and connect the PIN connector.
  8. Put cover back on.

    This post helped me a lot.
    https://forum.fractalaudio.com/threads/fan-noise.149521/post-2030718
0. Unplug the power cable.
 
Back
Top Bottom