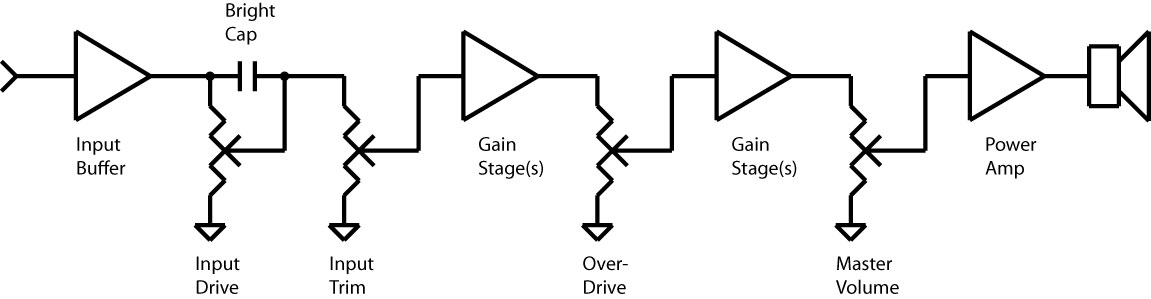
The amp block in the Axe-Fx has a variety of gain controls that change depending upon the amp model selected. These controls are:
Input Drive
Input Trim
Overdrive
Master Volume
These various controls are located at fixed points in the virtual amplifier circuit as follows:
Input Drive:
This is the modeled amp's gain, drive, volume, etc. control. It adjusts the attenuation at the input to the amplifier gain stages after the input buffer. On a Marshall Plexi, for example it is the "Loudness" control. On a typical Fender amp it is the "Volume" control. On many high-gain amps it is called either "Gain" or "Drive".
On a real amp this is implemented using a variable resistor called a potentiometer. Many amps include a "bright cap" on the drive control which is a small value capacitor placed across the terminals of the pot that bleeds treble frequencies through as the gain is reduced. Sometimes this bright cap is switchable via a switch on the amp. Sometimes it is fixed.
Input Trim:
The Input Trim control allows you to adjust the input attenuation without changing the frequency response. If you turn down the Input Drive and the model has a bright cap the amp will get brighter. Now you may like the brighter tone but wish there were more gain. Input Trim allows you to increase the gain without changing the tone. Conversely you may like the darker tone with Input Drive set high but wish there were less gain. In this case you can lower Input Trim.
Most real amps do not possess an Input Trim control. Instead they usually have a switch or two input jacks that select between a high-gain and low-gain input. Almost invariably the difference between these two jacks is 6 dB. All the Axe-Fx amps are modeled using the high-gain input or switch position (if any). To simulate the low-gain input set the Input Trim to 0.5 which is 6 dB less.
Overdrive:
Some amps possess an attenuation control between the later gain stages. Examples of the are the Mesa/Boogie Mark series, Dumble ODS and others. This control allows the user to vary the gain staging. The Input Drive can be turned up and the Overdrive turned down so that the earlier stages distort more and the later stages distort less and vice-versa.
Master Volume:
The Master Volume (MV) controls how much signal level is sent to the power amp. Many vintage amps have no MV control and the power amp runs "wide open". Modern amps often get their distortion from the preamp and the Master Volume then allows the user to control the volume of the amp.
The Master Volume in the Axe-Fx II, as well as on real amps, is probably the singular most powerful control in the amp block. As the Master Volume is increased the virtual power amp begins to distort. The virtual power amp also begins to sag and all sorts of beautiful magic occurs. The tone becomes more focused, the dynamic response changes, the note attack is accentuated, etc.
The key to crafting the ultimate tone involves understanding these various controls and learning how to balance them.
")