ruso
Fractal Fanatic
I wanted to give back to this awesome community by sharing a little tutorial I put together on how to EQ Match using your FM3, a DAW, and an isolated guitar track.
This can be performed in any DAW, using one of the many EQ plug-ins available, but for this particular example, I will be using the following:
MacBook Air (running MacOS 12.1 Monterey)
Logic Pro 10.7.2
Match EQ plug-in (included with Logic Pro)
Impulse Response Utility (included with Logic Pro)
LoopBack*
*LoopBack is a 3rd party app that allows you to route audio from one application to another and back. There are similar apps that are open-source such as Blackhole, JACK, and Soundflower, although I have no experience with them.
This tutorial assumes that you know your way around your FM3 and Logic Pro, but if you have any questions, please feel free to ask and I'll do my best to answer them. I will be editing this as I go, so please let me know if anything is unclear.
Step 1: Import Reference Material and Insert Instance of the Match EQ Plug-In
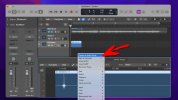
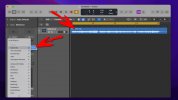
Import the reference material you wish to match into Logic Pro. Your reference material should contain isolated guitar without any other instruments. I won't go into detail on how to create or source them, but these guitar-only tracks or "stems" can be found with a simple web search. Make sure to either trim this track to the specific length or adjust the cycle range to loop the specific section of the track that you are trying to match. You want an interrupted, continuous sample; the more information the better. For example, if you are trying to match a heavy "chug" tone, you don't want to capture a solo or single note performance.
Step 2: Capture Reference Material
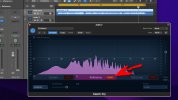
Start playback of the reference material that you are trying to match. Watch your levels and ensure that the input is not clipping. Select the "Reference" tab in the Match EQ and click the "Learn" button. Pay attention to the analyzer as it learns the Reference material. After about 10 seconds, you will notice that the analyzer is no longer making adjustments. In my experience, you get better results if you let the learning process complete. Click the "Learn" button again to end. You should have captured the EQ profile or “fingerprint” of the reference material. Save your work.
Step 3: Capture Raw Guitar Signal from FM3
Connect your FM3 to your computer and select the appropriate input in Logic so that you receive signal. Confirm that you have signal in Logic and adjust the input to ensure that it isn't clipping. This following is very critical in order to yield best results. Start with a tone that is dialed in close to the Reference tone. For example, if you know that the Reference tone was created using a Mesa Boogie Dual Rectifier, Tube Screamer, and a 4x12 Cabinet with V30's, start there and try to rough-in the tone. The closer you can get, the better results. I personally try to get close but really focus on the "feel." Is the bottom-end tight or loose? "Scooped" or "mid-focused?" Highly-compressed or "open and clear?" "Chewy?" "Woolly?" You get the point.
Go to your FM3 and navigate to Setup > Global Settings and change Cabinet Modeling to "Bypassed." Exit to the layout and disable all time-based effects. It should sound awful with the cabinet modeling disabled.
Go back into Logic, select the "Current" tab in the Match EQ. Click the "Learn" button and play your guitar (another approach is to record your performance and play back the track while it learns. Either approach yields similar results). I like to play a bunch of open chords, chromatic scales, and "chugs" to make sure I cover the entire frequency range. Pay attention to the analyzer as it learns. After about 10 seconds, you will notice that the analyzer is no longer making adjustments. In my experience, you get better results if you let the learning process complete. Click the "Learn" button again to end. You have captured the EQ profile or “fingerprint” of your raw guitar signal. Save your work.
Step 4: Match
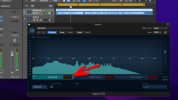
Click the "EQ Curve" tab and click the "Match" button. Observe the EQ adjustments that the plug-in made to match your tone to the recorded one. Save your work.
Note: I typically set "Smoothing" to zero initially as this seems to yield the closest results. Use your ears. By saving your progress, you can come back and make adjustments later.
Step 5: Move Match EQ Plug-in To Empty Track
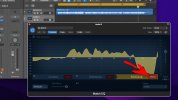
You can either open an additional instance of the Match EQ plug-in or simply move it to the empty track. What you will be doing is applying the new Match EQ curve to the test tone sweep sent from Impulse Response Utility, while capturing an impulse response.
Step 6: Configure Routing To Capture Impulse Response
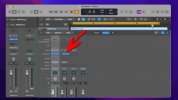
As noted, I will be using LoopBack from Rogue Ameoba to manage the routing. Below is the routing I use. Channel 5 will be used as the output channel in Impulse Response Utility to send to Input 5 in Logic Pro. Channel 7 will be used as the output channel in Logic Pro to send to the Input 7 in Impulse Response Utility.
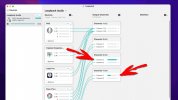
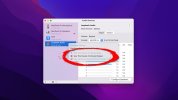
Open Audio Midi Setup, right-click on LoopBack Audio and set to both "Use This Device For Sound Input" and "Use This Device For Sound Output."
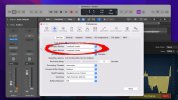
Go to Audio Preferences in Logic Pro and change both the Input and Output Devices to "LoopBack Audio."
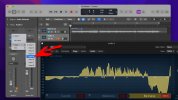
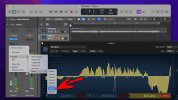
Change the Input of your empty track to Input 5 and the Output to Output 7.
In LoopBack, change both the Audio Input and Audio Output to "LoopBack Audio."
(continued next post)
This can be performed in any DAW, using one of the many EQ plug-ins available, but for this particular example, I will be using the following:
MacBook Air (running MacOS 12.1 Monterey)
Logic Pro 10.7.2
Match EQ plug-in (included with Logic Pro)
Impulse Response Utility (included with Logic Pro)
LoopBack*
*LoopBack is a 3rd party app that allows you to route audio from one application to another and back. There are similar apps that are open-source such as Blackhole, JACK, and Soundflower, although I have no experience with them.
This tutorial assumes that you know your way around your FM3 and Logic Pro, but if you have any questions, please feel free to ask and I'll do my best to answer them. I will be editing this as I go, so please let me know if anything is unclear.
Step 1: Import Reference Material and Insert Instance of the Match EQ Plug-In
Import the reference material you wish to match into Logic Pro. Your reference material should contain isolated guitar without any other instruments. I won't go into detail on how to create or source them, but these guitar-only tracks or "stems" can be found with a simple web search. Make sure to either trim this track to the specific length or adjust the cycle range to loop the specific section of the track that you are trying to match. You want an interrupted, continuous sample; the more information the better. For example, if you are trying to match a heavy "chug" tone, you don't want to capture a solo or single note performance.

Step 2: Capture Reference Material
Start playback of the reference material that you are trying to match. Watch your levels and ensure that the input is not clipping. Select the "Reference" tab in the Match EQ and click the "Learn" button. Pay attention to the analyzer as it learns the Reference material. After about 10 seconds, you will notice that the analyzer is no longer making adjustments. In my experience, you get better results if you let the learning process complete. Click the "Learn" button again to end. You should have captured the EQ profile or “fingerprint” of the reference material. Save your work.

Step 3: Capture Raw Guitar Signal from FM3
Connect your FM3 to your computer and select the appropriate input in Logic so that you receive signal. Confirm that you have signal in Logic and adjust the input to ensure that it isn't clipping. This following is very critical in order to yield best results. Start with a tone that is dialed in close to the Reference tone. For example, if you know that the Reference tone was created using a Mesa Boogie Dual Rectifier, Tube Screamer, and a 4x12 Cabinet with V30's, start there and try to rough-in the tone. The closer you can get, the better results. I personally try to get close but really focus on the "feel." Is the bottom-end tight or loose? "Scooped" or "mid-focused?" Highly-compressed or "open and clear?" "Chewy?" "Woolly?" You get the point.
Go to your FM3 and navigate to Setup > Global Settings and change Cabinet Modeling to "Bypassed." Exit to the layout and disable all time-based effects. It should sound awful with the cabinet modeling disabled.
Go back into Logic, select the "Current" tab in the Match EQ. Click the "Learn" button and play your guitar (another approach is to record your performance and play back the track while it learns. Either approach yields similar results). I like to play a bunch of open chords, chromatic scales, and "chugs" to make sure I cover the entire frequency range. Pay attention to the analyzer as it learns. After about 10 seconds, you will notice that the analyzer is no longer making adjustments. In my experience, you get better results if you let the learning process complete. Click the "Learn" button again to end. You have captured the EQ profile or “fingerprint” of your raw guitar signal. Save your work.

Step 4: Match
Click the "EQ Curve" tab and click the "Match" button. Observe the EQ adjustments that the plug-in made to match your tone to the recorded one. Save your work.
Note: I typically set "Smoothing" to zero initially as this seems to yield the closest results. Use your ears. By saving your progress, you can come back and make adjustments later.

Step 5: Move Match EQ Plug-in To Empty Track
You can either open an additional instance of the Match EQ plug-in or simply move it to the empty track. What you will be doing is applying the new Match EQ curve to the test tone sweep sent from Impulse Response Utility, while capturing an impulse response.

Step 6: Configure Routing To Capture Impulse Response
As noted, I will be using LoopBack from Rogue Ameoba to manage the routing. Below is the routing I use. Channel 5 will be used as the output channel in Impulse Response Utility to send to Input 5 in Logic Pro. Channel 7 will be used as the output channel in Logic Pro to send to the Input 7 in Impulse Response Utility.

Open Audio Midi Setup, right-click on LoopBack Audio and set to both "Use This Device For Sound Input" and "Use This Device For Sound Output."

Go to Audio Preferences in Logic Pro and change both the Input and Output Devices to "LoopBack Audio."

Change the Input of your empty track to Input 5 and the Output to Output 7.


In LoopBack, change both the Audio Input and Audio Output to "LoopBack Audio."
(continued next post)
Last edited:

