D
DM45110
Guest
Hey there! Welcome to my first post in this forum. If I'm doing something wrong here or use inappropriate language (I'm just a German guy...), let me know.
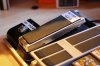
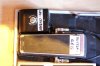
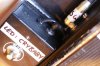
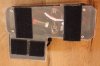
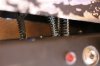
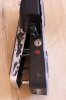
I want to show you my version of a versatile and easy to use wah controller specially made for the MFC. It is made of an old crybaby (which I did not like anyway), a single-button channel-selector stompbox, some minor electronic parts (switches, LEDs...), some mechanical parts (springs,nails...) and a plexi-glass plate so put everything together.
What you get:
- Spring-loaded Wah Controller (Auto-Engage)
- One switch to control X/Y wah status, so you get 2 different wahs
- Another Switch, I use it to engage a Graphic EQ after the wah block.
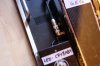
- One switch is next to the wah, one is in the wah, where the activating switch was
- LEDs, that indicate switching status
- automatic on/off-switching when pressing the lever (settings made in the AFX)
- only two jacks: one for switching (stereo-jack, two functions), one for the continuous controller
If you want to copy my build I am happy to send you instructions and the settings for the Axe FX.
If you've built something else in this territory, please add it so I can learn from your approaches.
Feel free to comment and make suggestions.
EDIT: The battery is only there to power the LEDs and it lasts very long. The rest is just controlling, no audio involved.
I want to show you my version of a versatile and easy to use wah controller specially made for the MFC. It is made of an old crybaby (which I did not like anyway), a single-button channel-selector stompbox, some minor electronic parts (switches, LEDs...), some mechanical parts (springs,nails...) and a plexi-glass plate so put everything together.
What you get:
- Spring-loaded Wah Controller (Auto-Engage)
- One switch to control X/Y wah status, so you get 2 different wahs
- Another Switch, I use it to engage a Graphic EQ after the wah block.
- One switch is next to the wah, one is in the wah, where the activating switch was
- LEDs, that indicate switching status
- automatic on/off-switching when pressing the lever (settings made in the AFX)
- only two jacks: one for switching (stereo-jack, two functions), one for the continuous controller
If you want to copy my build I am happy to send you instructions and the settings for the Axe FX.
If you've built something else in this territory, please add it so I can learn from your approaches.
Feel free to comment and make suggestions.
EDIT: The battery is only there to power the LEDs and it lasts very long. The rest is just controlling, no audio involved.
Attachments
Last edited by a moderator:
")