How to cut holes on a tin box?

Piing

Axe-Master
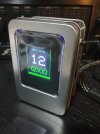
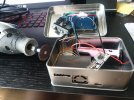
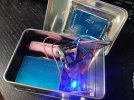
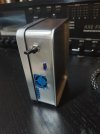
This is the prototype of a PM2.5 monitor built with Arduino. I have used a Dremel with a Cut-Off Wheel and then a small file.

Any tip to make it look better?
20220429_201536.jpg

Box.jpg001.jpg

I've found these cheap tin boxes with a transparent window and I intend to build more of these PM2.5 meters as gifts. I never knew what to bring when invited to a birthday, but now I got the idea of this DIY gift
 
Normally I think you'd want to use a punch on metal that thin. Since you're past that point, I might suggest 3d printing some grommet-like edging with inner and outer parts that you could glue together.
 
Normally I think you'd want to use a punch on metal that thin. Since you're past that point, I might suggest 3d printing some grommet-like edging with inner and outer parts that you could glue together.
That's a good idea. I have access to a 3D printer at work. I could make a large rectangular hole and fit a 3D printed bezel with the holes.
 
with handtools - looking great, human touch and all :D !
next level would be a milling machine with a vise that will proper support the thin tin.
or a co2 laser
 
Next time drill holes for your four corners and cut across. That will make your corners less overlapped and frayed. Leave a flange on the straight lines for the next step.

For the straight lines, get a small hand torch and get the metal hot. Use the heat to make the metal soft and use pliers to roll/fold the flanged edges inward.

Just a thought.
 
OP,

You could try an sturdier CNC PRO aluminum enclosure from www.lovemyswitches.com. My Temple Audio board utilizes one as an AC mains power source for my StroboStomp tuner and my FM9.

You'd need to drill out the enclosure to accommodate the access wells, then file down the access wells to allow for your connections. Here's what the aluminum enclosures look like and what we did for my AC mains...

iCxRWDO.jpg


FhmEZ73.jpg


RVU8l8r.jpg


v0cYjbz.jpg


tmm6JUu.jpg


sklNrUp.jpg


AfSi5Wb.jpg
 
My wife says that the handmade cut gives it a personal DIY touch, and the retro tin box is cool, but a pro-build would make it look like if I have purchased it from Ali Express. So maybe I'll make them all like that :D

There is a personalized birthday message at the splash screen, though.
 
My wife says that the handmade cut gives it a personal DIY touch, and the retro tin box is cool, but a pro-build would make it look like if I have purchased it from Ali Express. So maybe I'll make them all like that :D

There is a personalized birthday message at the splash screen, though.
So, what is it in the nifty box, anyway?
 
So, what is it in the nifty box, anyway?

  • Arduino Nano
  • 1.8" ST7735S IPS LCD display
  • Plantower PMS5003 Laser PM2.5 sensor
  • USB 5V 2A Boost Converter Step-Up Power Module Li Battery Charging Protection Board
  • 18650 3.7V 2600 mAh Lithium Ion battery

The program is roughly based on this one, with improvements for the display presentation:
https://how2electronics.com/interfacing-pms5003-air-quality-sensor-arduino/

A00.jpg

A PM2.5 monitor is important in a city like Bangkok. Even though some days you can see the "fog" and feel the nose clogged, it gives you a clearer indication of when to keep all windows fully closed, the efficiency of your air purifiers, and about whether to go out to the street with just the required light mask for covid or with a proper N95 mask
 
Last edited:
  • Arduino Nano
  • 1.8" ST7735S IPS LCD display
  • Plantower PMS5003 Laser PM2.5 sensor
  • USB 5V 2A Boost Converter Step-Up Power Module Li Battery Charging Protection Board
  • 18650 3.7V 2600 mAh Lithium Ion battery

The program is roughly based on this one:
https://how2electronics.com/interfacing-pms5003-air-quality-sensor-arduino/

View attachment 101005

A PM2.5 monitor is a important in a city like Bangkok. Even though some days you can see the "fog" and feel the nose clogged, it gives you a clearer indication of when to keep all windows fully closed, the efficiency of your air purifiers, and about whether to go out to the street with the required light mask for covid or with a proper N95 mask
Nice! Been thinking about getting or building a MIDI CC display to give some visual indication of the CC values of my couple of expression pedals, since I do a fair amount of 3 and 4 sound presets running entirely from a CC expression pedal. Doesn't need to be super granular, just enough to give me a good indication of when they are at roughly 1/3, 1/2, and 2/3. Seems like a super light task for an Arduino, even a Nano one....
 
Nice! Been thinking about getting or building a MIDI CC display to give some visual indication of the CC values of my couple of expression pedals, since I do a fair amount of 3 and 4 sound presets running entirely from a CC expression pedal. Doesn't need to be super granular, just enough to give me a good indication of when they are at roughly 1/3, 1/2, and 2/3. Seems like a super light task for an Arduino, even a Nano one....

Good idea. That would be a cool addition to any pedalboard. You could draw a series of horizontal bars indicating the position, or place the display horizontal and represent the actual angle with a drawing of the pedal position
 
Good idea. That would be a cool addition to any pedalboard. You could draw a series of horizontal bars indicating the position on the display, or place the display horizontal and represent the actual angle with a drawing of the pedal position
Was thinking old school, 13 LEDs in a row, with green ones in positions 0, 4, 6, 8, and 12, maybe with fade-in/out interpolation between them, so two light up when exactly between them, and moving either way dims the LED further from the CC value a bit at a time until the exact value of one or the other is reached. Probably more code and hardware in managing the dimming the LEDs than anything else....
 
Was thinking old school, 13 LEDs in a row, with green ones in positions 0, 4, 6, 8, and 12, maybe with fade-in/out interpolation between them, so two light up when exactly between them, and moving either way dims the LED further from the CC value a bit at a time until the exact value of one or the other is reached. Probably more code and hardware in managing the dimming the LEDs than anything else....

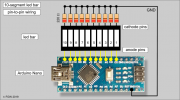
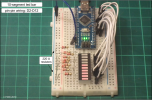
You can use a 10 segment LED bar with Arduino Nano

https://thesolaruniverse.wordpress....ontrol-a-ten-segment-led-bar-with-an-arduino/

1651286531471.png
1651286539318.png
 
I see two options to drive that, analog or digital:
1) Read the resistance of the pedal potentiometer (through a hi-impedance input buffer, to avoid interfering) on the Arduino Analog Input
2) Reading MIDI
 
I see two options to drive that, analog or digital:
1) Read the resistance of the pedal potentiometer (through a hi-impedance input buffer, to avoid interfering) on the Arduino Analog Input
2) Reading MIDI
Was thinking #2 would be best. Each LED could have a handful of values where it is considered "in range", and a handful on either side that are considered "near range" where it would fade the LED in/out as the CC value got closer to or farther from in-range. Bummer it'll only do 10 LEDs, tho. Is there a bigger one that can do more LEDs?
 
Greenlee Hole Cutters cut very clean holes, we use them on aircraft aluminum and Stainless panels, Firewalls etc.
I can corroborate that. I have a couple of their punches, for various sizes of vacuum tube sockets. Good quality tools are a joy to work with, if you can afford them.... :)
 
Back
Top Bottom