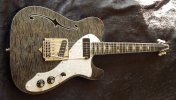
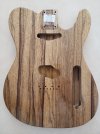
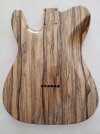
Building my first Tele (Warmoth)

I like Tusq nut material, next best thing to bone IMO and much more consistent.
I like it too but it wares quickly so I went back to bone. Not all pieces are as good as each other though so sometimes a few end up in the bin.
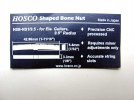
You can buy pre cut nuts in bone from Hosco and they are IME very good and require a minimum of fine tuning to fit. I suggest this for people who don't want to spend $100 on decent nut files and a gauge for string spacing . It is possible to cut an excellent bone nut with only needle files and sand paper but it is not a beginner job.
 
HSBNS195R_01.jpg
This is really the way to go for a home build. They make a variety of sizes that should cover most bases. Trim it to size with fine (600grit) on a flat true surface and be carful to keep it all square and true.
If you are unsure about doing it this is a job for a trusted tech, at least as critical as fretwork.
 
hardware - consider gotoh... very reasonably priced and great quality. big fan. their auto locking tuners are a fav. used them on my last build. nice and light, yet locking. admittedly... a little finicky. their compensated tele bridge/saddles - lovely. $45ish on evilbay?

if you are going for cheaper pickups... hard to beat bootstrap. handwound and verified quite nice. have some demos on youtube if you'd like to hear.

one of my last builds... features a bootstrap squeeky clean in the neck. I'm not going to say they are as good as or better than some of the other fancy options - but they are def the best you'll find for cheap.

1_DSCN4014_Color.JPG
 
I have built a few parts casters in the past prior to a Warmoth strat build last year. I might have paid a little more but getting everything but tuners and pickups from Warmoth sure made the build easier. I learned the hard way on the parts casters builds that not all parts fit as described when buying from individuals on certain used sites.
Shielding as needed some guitars with some without
I vote - Tusq XL nut material to my ears it sounds the same as a bone nut
I agree about the Tusq nut sounding great, maybe even slightly better than bone but quite a few of my touring pro customers have had problems with the G in particular self cutting the slot deeper with string changes and tremolo use. So for practicality I went back to fitting bone as standard unless somebody wants something specifically . Great tone though.
 
What was the reason not to have Warmoth do the nut?

I was leaving my options open at the time.
My other necks from Warmoth all ordered with no nut install.
I have my luthier install the nuts. All bone so far.
I may go with the Tusq. Even if it does wear out, its not a lot of $ to get a new one installed.
Thanks!
 
Here is my update as of today.
Again I am using the Minwax rub on polyurethane in clear gloss.
It goes on and dries very thin. After each coat dried, I lightly sanded the surface to prepare for the next coat.
Now, there are 10 coats on it. The color didn't change much after the second coat.
I am wondering what to do next for the finish. Wet sand it? I have the Micro Mesh kit that goes all the way up to 12,000 grit!
Any suggestions?

T front.jpgT back.jpg
 
Try flating it with 1500 wet and see if you can get it flat but I don't expect you will unless you used a grain filler first.
What are you aiming for ? A satin rubbed finish or a smooth gloss? if the latter you'll need a lot more coats.
 
Rubbed satin would look great. All you would need to do that is fine micromesh between coats and do another few ending in mesh.
 
I am aiming for a gloss finish. I didn't use a grain filler first. (live and learn)
I am okay with the natural grain pores leaving a texture on the wood.

In between the last 2 coats, I did wet sand one coat at 2400 and next coat at 4000 grits.
Thanks for the guidance and suggestions.
 
Looking good, patience is key.

Be careful not to associate Micro Mesh numbers with the actual sandpaper grit (Micro Mesh 1500 = 400 grit sandpaper, Micro Mesh 4,000 = 1500 grit sandpaper). There are some charts online but I haven't found any complete through Micro Mesh 12,000.

It looks like you're getting a decent sheen on the finish, seeing the light reflections on the radius- I'm seeing a glossy-semi-gloss. To achieve a high gloss, you will need to buff once the finish is completely cured (up to 30 days). If you wet sand to 6,000 or even 4,000 grit sandpaper, a light rubbing compound or mirror glaze followed by a swirl mark remover compound could be all you'll need.

Should you decide to buff the finish, I've used the Buff-N-Shine 3" buffing kit with an electric drill and like the control it offered. I've polished table tops (faux marble) and cars with larger 8 and 9 inch pads and wouldn't consider anything larger than 5.5 inch for a guitar body. As the diameter gets larger, the speed of the outer edge of the pad increases dramatically, making it easier to burn through the finish.
 
Thanks @JoKeR III
I will compare the Micro Mesh to some standard sand paper to see how it compares.
The pictures don't really show how glossy / shiny it really is. I may add another picture when I have a moment.

So if I am happy with the shine, I need to wait 30 days, then buff as you recommend with the 3" kit.
Can you recommend a place to purchase the buff-n-shine 3" buffing kit?
I don't know what to use on the buffing pads if I'm happy with the gloss shine in 30 days.
Please advise.
Thank you!
 
If you like the shine, the only reason to buff would be any imperfections in the finish like brush or rag strokes, bumps from dust etc.... In that case, you'll need to wet sand and buff. As far as the 30 days, it's just a good rule of thumb, it ensures the finish is completely cured or hard. Buffing a finish that's not completely hardened will likely get scratches from the buffing compounds and pads heating and softening the finish.

https://buffandshine.com/products/small-buffing-kits-tp-3
Amazon product ASIN B01N25Q9YThttps://www.woodworkingshop.com/product/ka10024/
https://www.ebay.com/itm/322097198335?hash=item4afe7d34ff:g:JxcAAOSwYmZXKmhb
 
Machine buffing a thin wipe on finish is risky IMO you are likely to get rub throughs. If it was me doing it with those materials I would 2500 wet sand (minimal on the flat parts with a block) and just go to the rubbing compound . Because of the grain sink (looks nice) you won't see a glass finish whatever you do . The final outcome will look indistinguishable and involve a lot less risk. If you do rub through it is usually easily fixed but then you are starting the clock again before you can continue.
 
Okay, I understand the concern for machine buffing. When I practiced first on a piece of Pine, I really got to see and understand just how thin each coat is. Looking at the body, the finish is smooth and uniform, pretty much everywhere, and more shiny / glossy than you can see from my cell phone pics. I am happy with the look and feel of it now.

Are we saying, if I am happy with the finish, wait ~30 days to fully cure, then only buff - only by hand?
Thanks guys!
 
Back
Top Bottom