Anyone know how to replace a LCD for a FAMC Liquid Foot+ LF+?

GotMetalBoy

Power User
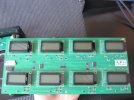
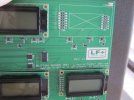
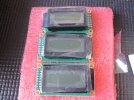
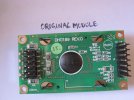
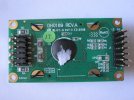
I help a lot of people setup their FAMC Liquid Foot+ aka LF+ and I recently had someone contact me because one of the small LCD screens won't show text anymore. No one has been able to get a hold of FAMC support for over a year, so he can't have it repaired or find out the LCD info to replace it.

Does anyone know what make and model the LCD is and where to buy a replacement?

I took apart my LF+ but the LCD's are soldered into the board, so I can't see underneath them to find any info and I don't want to unsolder any of them. I took some pictures hoping someone might know what they are.


2021-06-08 12.10.47.jpg
2021-06-08 12.10.53.jpg
2021-06-08 12.11.04.jpg
2021-06-08 12.12.42.jpg
2021-06-08 12.12.48.jpg2021-06-08 12.12.44.jpg
2021-06-08 12.12.52.jpg
 
I had to replace 3 of them on my JR+ in 2014, when my unit was 3 months old. FAMC were responsive and sent me replacements quickly and for free. I have used my JR+ multiple times a week ever since with no issues.

The modules just pull out and push back in. As I’m sure you’ve noticed, there’s 2 rows of pins on each side, so try and pry each side up at an even rate, rather than trying to get one side completely out before the other. That way you won’t bend the pins or damage the sockets. Firm but gentle pressure under each side (near the pins) of the module’s green PCB should be enough to pop them out. Then just put the replacement one in, making sure it is seated on both sides and sitting like the other modules.

Here are the instructions they sent me for my JR+. At the end of step 7, replace “push down on” with “lift” when you're trying to get them out!

Option 2: full lcd module check.

1. Unscrew all screws.
2. Remove the bottom cover
3. Remove the expression pedal nuts with wrench (main board and bracket will be removable at this point.
4. Flip over main board- take a picture for reference of where cables are. Notice Red wire on LCD ribbon cable.
5. Remove the gray ribbon cable from main board.
6. Unscrew your button board (6 screws)- be careful not to damage the white ribbon cable!
7. You now can slowly flip over the button board (with the main board at same time). Push down on both sides of each LCD module.

Reverse the steps to put it all back together.

Here's a couple pics I took of my board with and without modules. The replacement modules I got had a newer revision number, DH0189 REV.A stamped on them, so I know they’re not from the same batch as the others which were DH0189 REV.0.

EDIT: I've tried Googling all related part numbers printed on the modules (DH0189, E318580, E218318 etc) with no luck so far. @guitarnerdswe had a good idea, send some of these pics to the major electronic parts distributors and they might help with identification. Good luck!
 

Attachments

  • IMG_7645.jpg
    IMG_7645.jpg
    191.7 KB · Views: 17
  • IMG_7653.jpg
    IMG_7653.jpg
    91.6 KB · Views: 15
  • IMG_7655.jpg
    IMG_7655.jpg
    133.4 KB · Views: 13
  • IMG_7667.jpg
    IMG_7667.jpg
    2.6 MB · Views: 14
  • IMG_7671.jpg
    IMG_7671.jpg
    2 MB · Views: 15
  • IMG_7670.jpg
    IMG_7670.jpg
    1.9 MB · Views: 16
Last edited:
I had to replace 3 of them on my JR+ in 2014, when my unit was 3 months old. FAMC were responsive and sent me replacements quickly and for free. I have used my JR+ multiple times a week ever since with no issues.

The modules just pull out and push back in. As I’m sure you’ve noticed, there’s 2 rows of pins on each side, so try and pry each side up at an even rate, rather than trying to get one side completely out before the other. That way you won’t bend the pins or damage the sockets. Firm but gentle pressure under each side (near the pins) of the module’s green PCB should be enough to pop them out. Then just put the replacement one in, making sure it is seated on both sides and sitting like the other modules.

Here are the instructions they sent me for my JR+. At the end of step 7, replace “push down on” with “lift” when you're trying to get them out!


Here's a couple pics I took of my board with and without modules. The replacement modules I got had a newer revision number, DH0189 REV.A stamped on them, so I know they’re not from the same batch as the others which were DH0189 REV.0.

Wow!!! Thank you so much!!! This is really great info! I'm going to add this to my LF+ tutorial on the FAS Wiki:

https://wiki.fractalaudio.com/wiki/index.php?title=FAMC_Liquid_Foot+
 
Back
Top Bottom